
- Configuration
- Capabilities
- Examples
Configuring Settings for AI in MetaEditor
AI settings cover the built-in AI Assistant, the MetaEditor MCP server, and applicable third-party agents or apps. If you use only the AI Assistant, you can focus squarely on its settings or stick with the default values.
Your AI Assistant and MCP server settings are automatically synchronized between MetaEditor and trading terminal since both apps use the same settings. The only exception is the MCP server address, which must be unique for each app.
AI Assistant #
Click Tools \ Options in the top menu, then navigate to the AI Assistant tab.
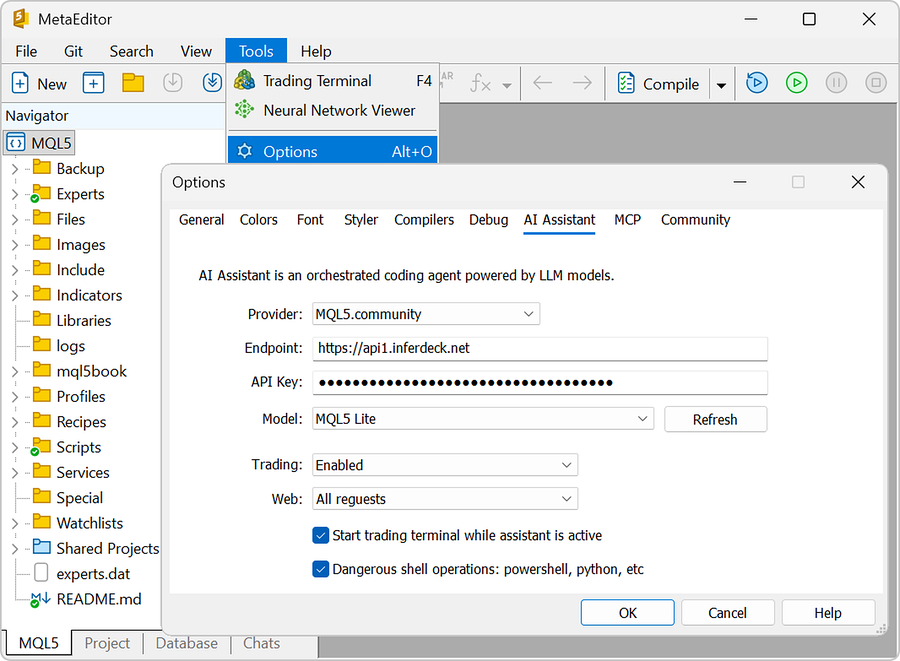
MetaEditor automatically configures the settings for the AI Assistant to use the free MQL5 Lite model by default. If you want the AI Assistant to use a different model, then you must set a new provider, endpoint, API key, and model:
- Provider – select your preferred AI provider. MQL5.community is selected by default. Available options include Anthropic, OpenAI, Gemini, DeepSeek, xAI, etc.
- Endpoint – enter the base URL for your selected AI providers API endpoint. The endpoint is often inferred automatically from the chosen provider. Manual editing may be required if you want to use custom proxies, local deployments, or enterprise API gateways.
- API Key – input your authentication key for the selected AI provider to grant access to your account and model quotas.
- Model – choose a model offered by the selected provider. Clicking the Refresh button reveals available models.
Irrespective of the provider selected for the AI Assistant, you can control or restrict its trading, web, and shell capabilities via the following options:
- Trading – choose whether you want the AI agent to be able to execute trades, request explicit confirmation, or not trade at all.
- Web – choose whether you want the AI agent to be able to use full web functionality, GET requests only, or stay locked out from the web.
- Start trading terminal while Assistant is active – enable this option if you want MetaTrader Terminal to be running whenever the AI Assistant is in use. This enables the AI Assistant to use terminal tools for trading, backtesting, chart operations, and more.
- Dangerous shell operations: PowerShell, Python, etc. – enable this option if you want the AI Assistant to be able to execute shell commands on your computer and operate outside the sandbox of the MQL5, Tester, Logs, and Common directories. This empowers the AI Assistant to use any available tools, packages, or services, such as PowerShell or Python, to perform tasks.
Click OK to save changes.
MCP Server #
Click Tools \ Options in the top menu, then navigate to the MCP tab.
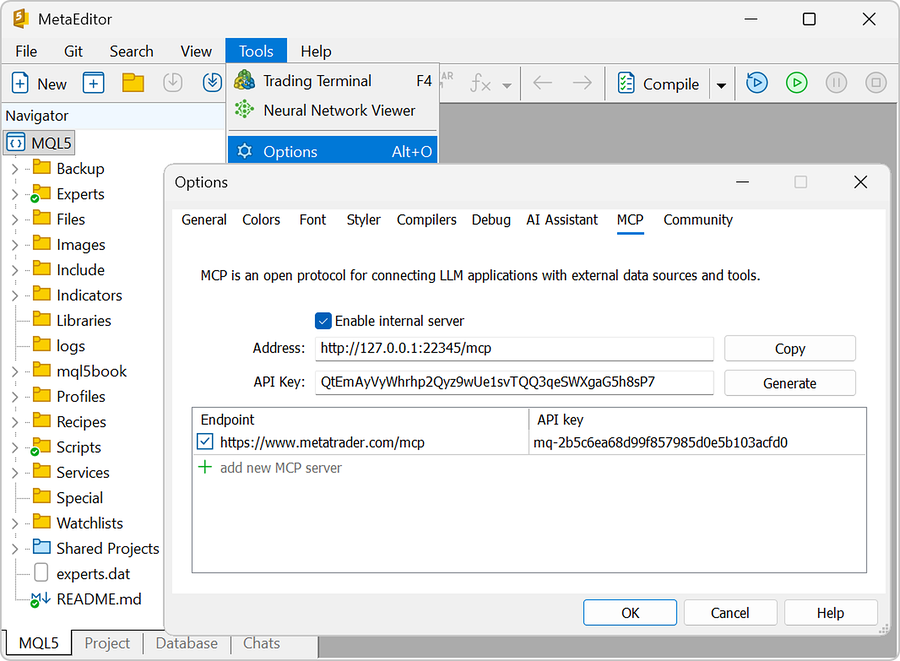
MetaEditor automatically configures the correct MCP settings by default. If you plan to connect MetaEditor to an external AI agent or app, you need the details provided here.
Get MCP Details #
Clicking the Copy button adds these details to your clipboard:
## Claude Code as .mcp.json file in project folder
{
"mcpServers": {
"metaeditor": {
"type": "http",
"url": "http://127.0.0.1:22345/mcp",
"headers": {
"Authorization": "Bearer <token>"
}
},
"terminal": {
"type": "http",
"url": "http://127.0.0.1:22346/mcp",
"headers": {
"Authorization": "Bearer <token>"
}
},
"marketdata": {
"type": "http",
"url": "https://www.metatrader.com/mcp",
"headers": {
"Authorization": "Bearer <token>"
}
}
}
}
## ChatGPT Codex as .codex\config.toml in project folder
[mcp_servers.metaeditor]
url = "http://127.0.0.1:22345/mcp"
enabled = true
http_headers = { "Authorization" = "Bearer <token>" }
[mcp_servers.terminal]
url = "http://127.0.0.1:22346/mcp"
enabled = true
http_headers = { "Authorization" = "Bearer <token>" }
[mcp_servers.marketdata]
url = "https://www.metatrader.com/mcp"
enabled = true
http_headers = { "Authorization" = "Bearer <token>" }
It contains two sections: one for Claude Code and another for Codex. Each section includes settings for three MCP servers:
- metaeditor MCP server – provides MetaEditor's tools for algorithm development and complex file operations.
- terminal MCP server – provides the platform's tools for placing and managing orders, getting account data, controlling UI elements, and more.
- marketdata MCP server – provides MetaTrader.com's market data, news, economic calendars, events, and related information.
Simply paste the necessary sections to your external AI agent explained below.
Adjust MCP Settings #
If necessary, you can adjust these MCP settings:
- Enable internal server – enable this option to turn on the built-in MetaEditor MCP server, allowing external AI clients and agents to connect directly to MetaEditor. This option does not control the terminal or marketdata MCP server.
- Address – specify the host IP address and port number (e.g., http://127.0.0.1:22345/mcp) on which the MetaEditor MCP server listens for incoming client connections. This address should not be used by any other application.
- API Key – generate a secure token required by external AI apps or clients, such as Claude Code or Codex, to authenticate and access MetaEditor's data and functionality.
In the Endpoint section, you can enable or disable an existing MCP endpoint and add new ones.
Click OK to save changes.
After adjusting your MCP settings and saving the new configuration, you need to click the Copy button to get the latest details.
Configure Third-Party Agents and Apps #
The guides below focus on Claude Code and Codex, but the platform's MCP servers are not limited to them. You can connect the servers to any MCP-compatible AI agent or application via a JSON configuration, similar to the one used by Claude Code.
If you work with Codex, copy the corresponding part of the above code to the config.toml file in .codex subfolder of your project. For system-wide access, add the code to global ~/.codex/config.toml file.
[mcp_servers.metaeditor]
url = "http://127.0.0.1:22345/mcp"
enabled = true
http_headers = { "Authorization" = "Bearer <token>" }
[mcp_servers.terminal]
url = "http://127.0.0.1:22346/mcp"
enabled = true
http_headers = { "Authorization" = "Bearer <token>" }
[mcp_servers.marketdata]
url = "https://www.metatrader.com/mcp"
enabled = true
http_headers = { "Authorization" = "Bearer <token>" }
For example, open your local Codex app and click File \ Open Folder. Then create a folder that will become your project root, for example, D:\My Project. Place the settings file as D:\My Project\.codex\config.toml.
Restart Codex, then go to File \ Settings \ Plugins \ MCPs to check if the platform's MCP servers have become available. You should see the servers on the list.
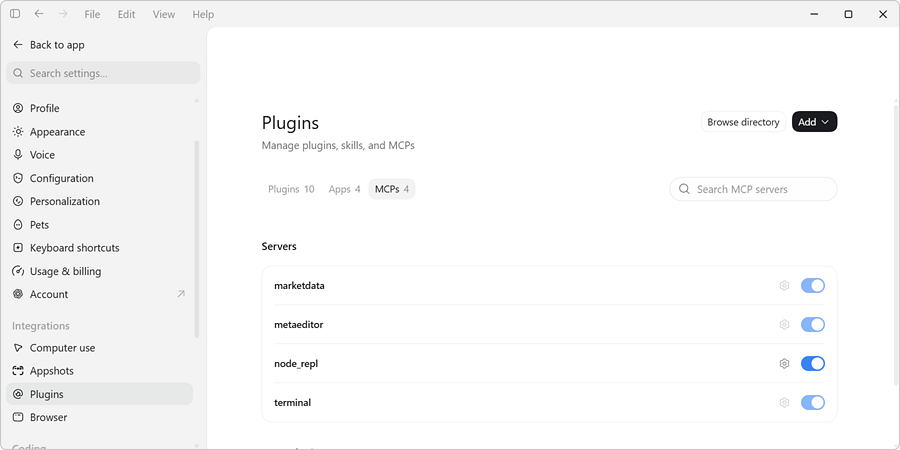
You can also ask Codex for tools available for your platform to make sure it is ready for work:
If you work with Claude Code, copy the corresponding part of the above code to the .mcp.json file in your project folder. For system-wide access, add the code to global ~/.claude.json file.
{
"mcpServers": {
"metaeditor": {
"type": "http",
"url": "http://127.0.0.1:22345/mcp",
"headers": {
"Authorization": "Bearer <token>"
}
},
"terminal": {
"type": "http",
"url": "http://127.0.0.1:22346/mcp",
"headers": {
"Authorization": "Bearer <token>"
}
},
"marketdata": {
"type": "http",
"url": "https://www.metatrader.com/mcp",
"headers": {
"Authorization": "Bearer <token>"
}
}
}
}
Restart Claude Code for the settings to take effect.